Displaying personalized content in AppSheet
I'm currently trying to build apps without writing code to find the limits and potential of no-code platforms. This article adds personalization to [a room booking app built with AppSheet](https://www.kevlatus.de/blog/building-a-room-booking-app-without-writing-code). The app allows users to manage rooms within their buildings and booking those rooms for meetings. If you are new to AppSheet, I recommend [reading this article](https://www.kevlatus.de/blog/building-a-room-booking-app-without-writing-code) first.
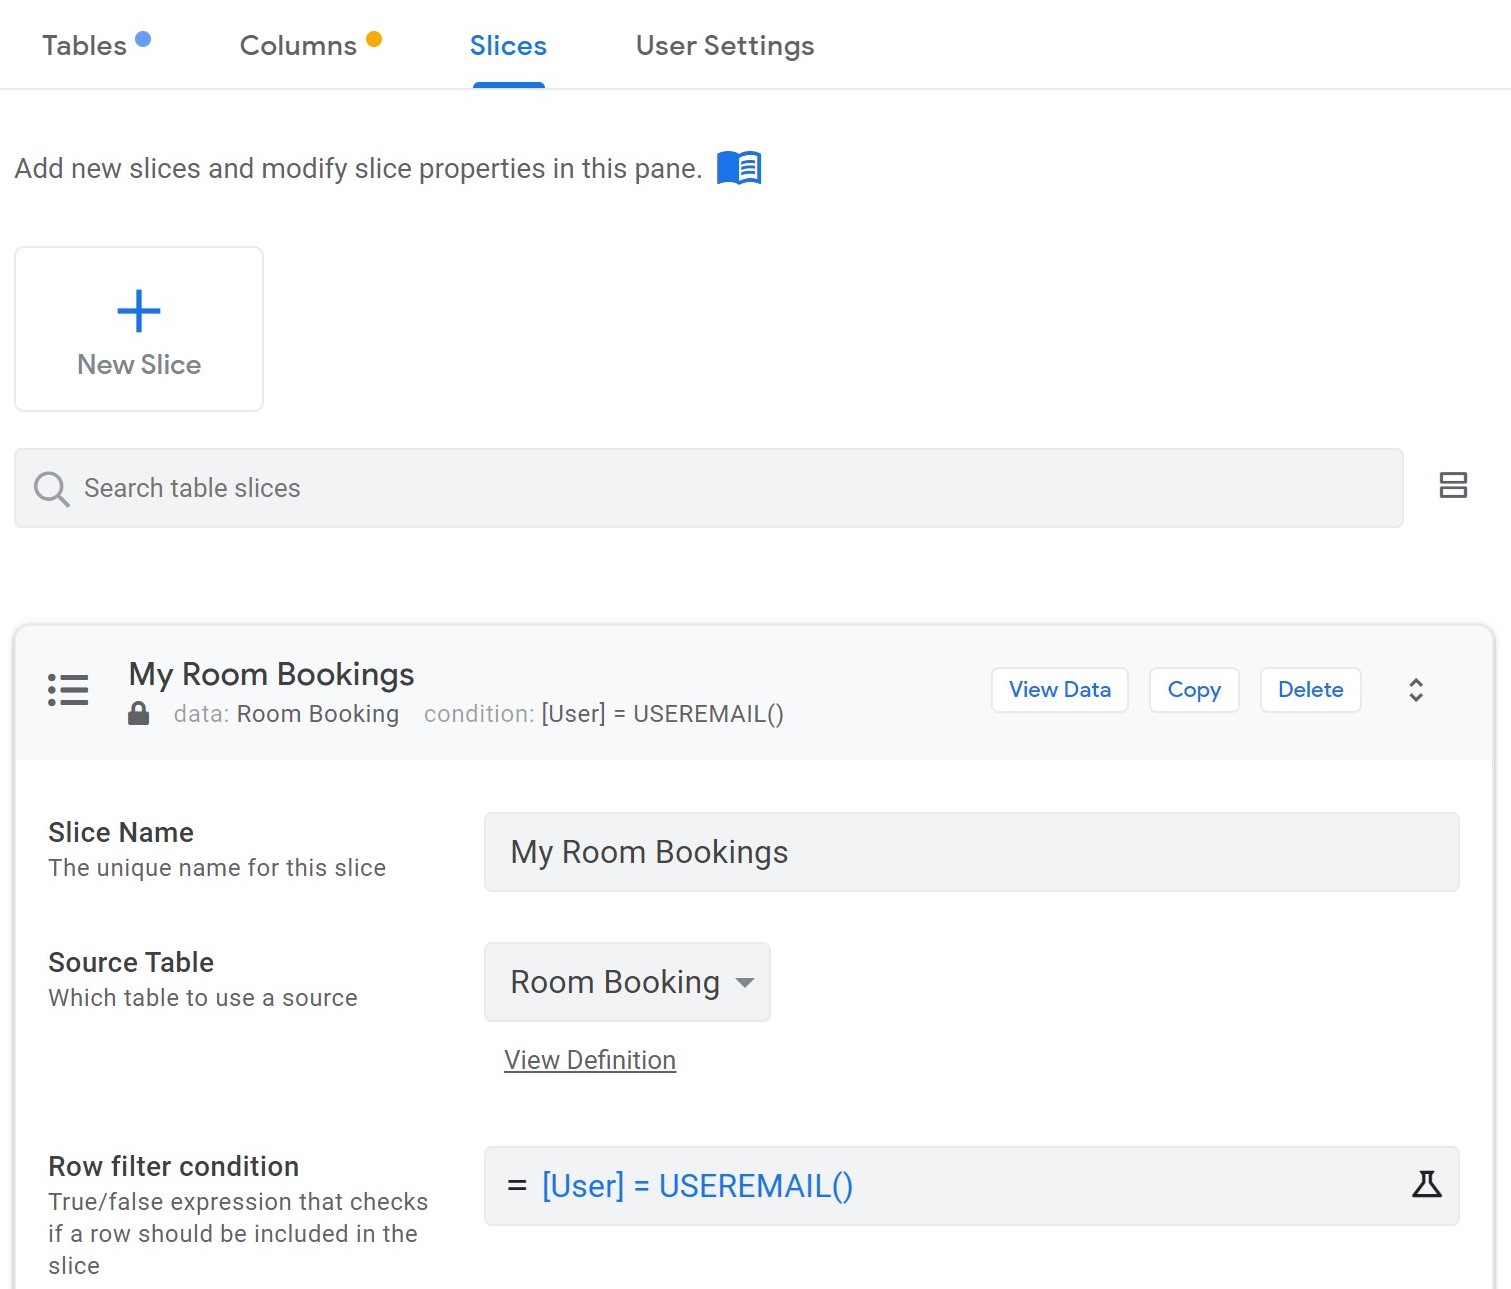
Our goal is to show users a list of their bookings as well as their favorite rooms. These views enhance user experience tremendously by providing quick access to relevant information. Let's get started with the personal booking overview: it makes use of AppSheet's slices under Data > Slices in the menu. A slice is a filtered subset of data, which can be used like a table. Since a booking already contains a column for the corresponding user, the filter condition is simply `[User] = USEREMAIL()`, as shown in the screenshot below.
Now, this slice can be used as the source of a new view in the UX menu. We call it "My Bookings" and select our slice _for this data_. I personally prefer the card view for this page, because it lets us show the room's picture, name and booking date, which makes for a clean and simple overview. And actually, that's all what is needed for adding the personal booking list.
Building the favorite rooms view turns out to be trickier. When browsing through AppSheet's features, you might stumble upon its _User Settings_ in the _Data_ menu. While this sounds like a suitable solution for storing preferences and favorites, it suffers from a hidden limitation: values stored in user settings are not synced across devices. This would lead to favorites being different, depending on the device a user opens your app on. Though useful in some situations, I'd rather keep the experience consistent across mobile and the web by writing the information into a Google Sheet.
When initially working on this feature, I found an approach [in the forums](https://community.appsheet.com/t/i-would-like-to-create-a-favorites-behavior/3811), which adds and removes users' email addresses to a text column. Although this is a simple solution, which works in small apps, larger apps will run into issues: two users simultaneously adding a room to their favorites, results in a race condition for updating the cell value and data from one of the users might not be stored. Furthermore, searching for mail addresses in a long string of a much liked room is rather time consuming and decreases performance for loading favorites.
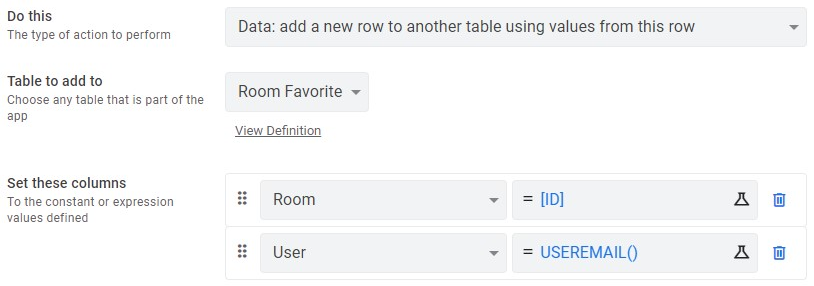
Therefore, I decided to introduce a mapping table for rooms and users; also known [as many-to-many relationship in relational databases](https://en.wikipedia.org/wiki/Many-to-many_(data_model)). This basically is a table with two columns: User and Room, both of which store the id/mail of a corresponding record. Whenever a user adds a room to their favorites, a new row with the corresponding mapping is added to the table and deleted, if the user removes it from the favorites. This approach has a surprising advantage besides its scalability and failure prevention: changes are shown to the user in real time, whereas the text column approach requires a manual sync to show changes in the UI. Though I couldn't find documentation for this behavior, it is good to know that row-level operations allow for instantaneous UI updates. We can see this when implementing our "favorite" buttons: navigate to Behavior → Actions and create a new action called "add room favorite". Select the _Room_ table and tell it to "add a new row to another table using values from this row" and choose the _Room Favorite_ table to add to. The column setup is shown in the following screenshot.
In the Behavior section of this action, I add a little snippet to the visibility condition:
```javascript
ISBLANK(
FILTER(
"Room Favorite",
AND(
USEREMAIL() = [User],
[_THISROW].[Id] = [Room]
)
)
)
```
This ensures that the button is only shown, when the room is not already a favorite of this user. Now we can add a corresponding "unfavorite" button, which is only shown, when the opposite condition is true:
```javascript
ISNOTBLANK(
FILTER(
"Room Favorite",
AND(
USEREMAIL() = [User],
[_THISROW].[Id] = [Room]
)
)
)
```
The logic here is to filter for all rooms, which have an entry in the _Room Favorite_ table, while this entry also matches the currently signed in user. The table setup for this action is identical to above's action, but it instead "executes an action on a set of rows", which we set to the the system-level "Delete" action. The referenced rows to delete are given by this formula: `FILTER("Room Favorite", [_THISROW].[Id] = [Room])` selecting all favorite entries that match the given room. To see the potential of AppSheet's actions and workflows, you may want to [check out this article](https://www.kevlatus.de/blog/syncing-calendar-events-with-appsheet).
To actually present a user's favorites in the UI, we again make use of the slices feature by creating a slice called "My Room Favorites" based on the _Room_ table. The filter condition is the same as for the "unfavorite button, since this already filters for all favorite rooms. As before, we can now select this slice for a new view in the UX menu. The final behavior can be seen in the animation below.
__Bonus tip #1:__ I set the actions' appearance to "Display overlay" and chose a regular and a solid star icon for the favorite and unfavorite actions respectively to mimic common implementations.
__Bonus tip #2:__ You can "show system actions" at the bottom of the actions page to show the favorite table's delete action. Here you can disable the confirmation toggle, so a user can delete a favorite without being shown a confirmation dialog.
I hope this short introduction into personalization with AppSheet was helpful to you. You can find the [complete app template here](https://www.appsheet.com/Template/AppDef?appName=RoomBooker-2164883), as well as [its data source](https://docs.google.com/spreadsheets/d/1Kowowbe6Z8kBwCVQSM9e4YlKmLiDfJV_V-2ONmD0pAY/edit#gid=1755648877). Please join the discussion, if you have any questions or know of similar use cases for the shown features.
~6 min read13 February 2021
Building a room booking app without writing code
You have a great idea for an app? The problem is that you can't write code or don't want to build it from scratch? Wait no more: in this article, Mia will show you how to develop an app with zero lines of code within in a couple of hours using AppSheet and provides you with a one-click link to copy it.
### What is AppSheet?
Let me tell you this little story: When Oliver from engineering approached a consultancy about an app idea, he could not have been more frustrated with the effort and budget required to implement it. Lacking the knowledge about software development, he reached out to his friend Mia, who happens to be a software engineer. Unfortunately, she confirmed the estimate of coding this app from scratch. Even though it is only supposed to manage room bookings for his company, it requires a database for storage, a front-end for interaction, security rules and thorough testing to name just a few. And if he chose to contract the consultancy, he would depend on them for future adjustments due to the lack of knowledge about how to maintain it.
Then Mia remembers reading about the no-code platform AppSheet, which would allow Oliver to build the room booking app himself, since it doesn't require any prior knowledge. They only need to [register for a Google account](https://support.google.com/accounts/answer/27441?hl=en) and use it to sign into AppSheet. Once signed in, you can either copy an example app, follow a step-by-step guide or provide your own data from a Google Sheet. Afterwards, the interface provides basic controls to configure how a user might view, add and change data.
### Designing the data model
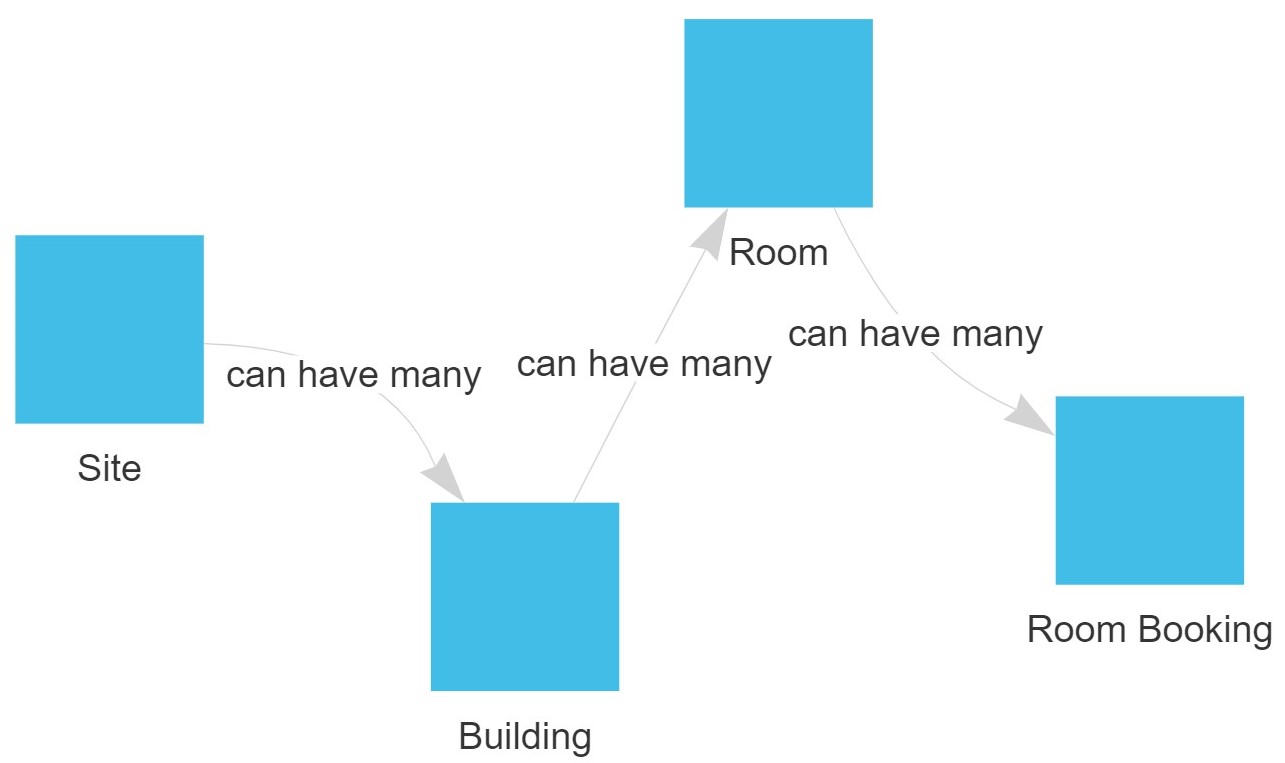
To get started, Mia tells Oliver to first think about the data domain for his app. The data domain refers to all objects that need to be stored in the database, like rooms and bookings. So they create a new Google Sheet at [sheets.new](http://sheets.new) and populate it with four sheets for storing sites, buildings, rooms and bookings.
Since Oliver's company operates from multiple locations, the data model needs to store information about available sites. As the following table shows, this sheet only contains three columns for storing a unique identifier, a site's name and location.
| Column Name | Description |
| ----------- | ------------------------------------------------------ |
| ID | a unique identifier for referring to a site internally |
| Name | the name used for displaying a site in the UI |
| Address | the physical location of this site |
The second sheet stores information about buildings at a site. Again, the columns are very basic, but now the reason for having a unique id property is shown. Because each building must be located at an existing site, its _Site_ property references an id in the site table. "In database terms, this is referred to as a foreign-key relationship", Mia explains proudly.
| Name | Description |
| ---- | ---------------------------------------------------------- |
| ID | a unique identifier for referring to a building internally |
| Name | the name used for displaying a building in the UI |
| Site | a reference to the site this building is located at |
Slowly getting the hang of it, Oliver suggests that a room's structure is identical, but instead of referencing a site, it references a building; which is exactly the case.
Now for storing room bookings, we need more information: besides recording the corresponding room, start and end times as well as the person booking the room must be known.
| Name | Description |
| ------ | --------------------------------------------------------- |
| ID | a unique identifier for referring to a booking internally |
| Room | a reference to the room, which is being booked |
| Person | the mail address of the person booking the room |
| Start | start date and time of this booking |
| End | end date and time of this booking |
With this data model in place, we are set for importing the tables in AppSheet and building the user interface for interacting with the data.
### Building the app
So, Mia heads to appsheet.com and creates a new app using the "start with your data" option, where she locates the previously stored Google Sheet. AppSheet automatically imports the first table from the sheet and provides one-click suggestions for importing the others. The live demo already features a button for registering a new site, which shows a corresponding form when clicking it. Unfortunately, the id field is editable in the form, so they navigate to the Columns tab in AppSheet's Data section and inspect the Site columns. Toggling the checkbox on the id's Show? property immediately hides it from the preview. Oliver, already getting excited about how quickly they can make changes to the app, realizes that AppSheet automatically detected that buildings are linked to sites and created a backreference column.
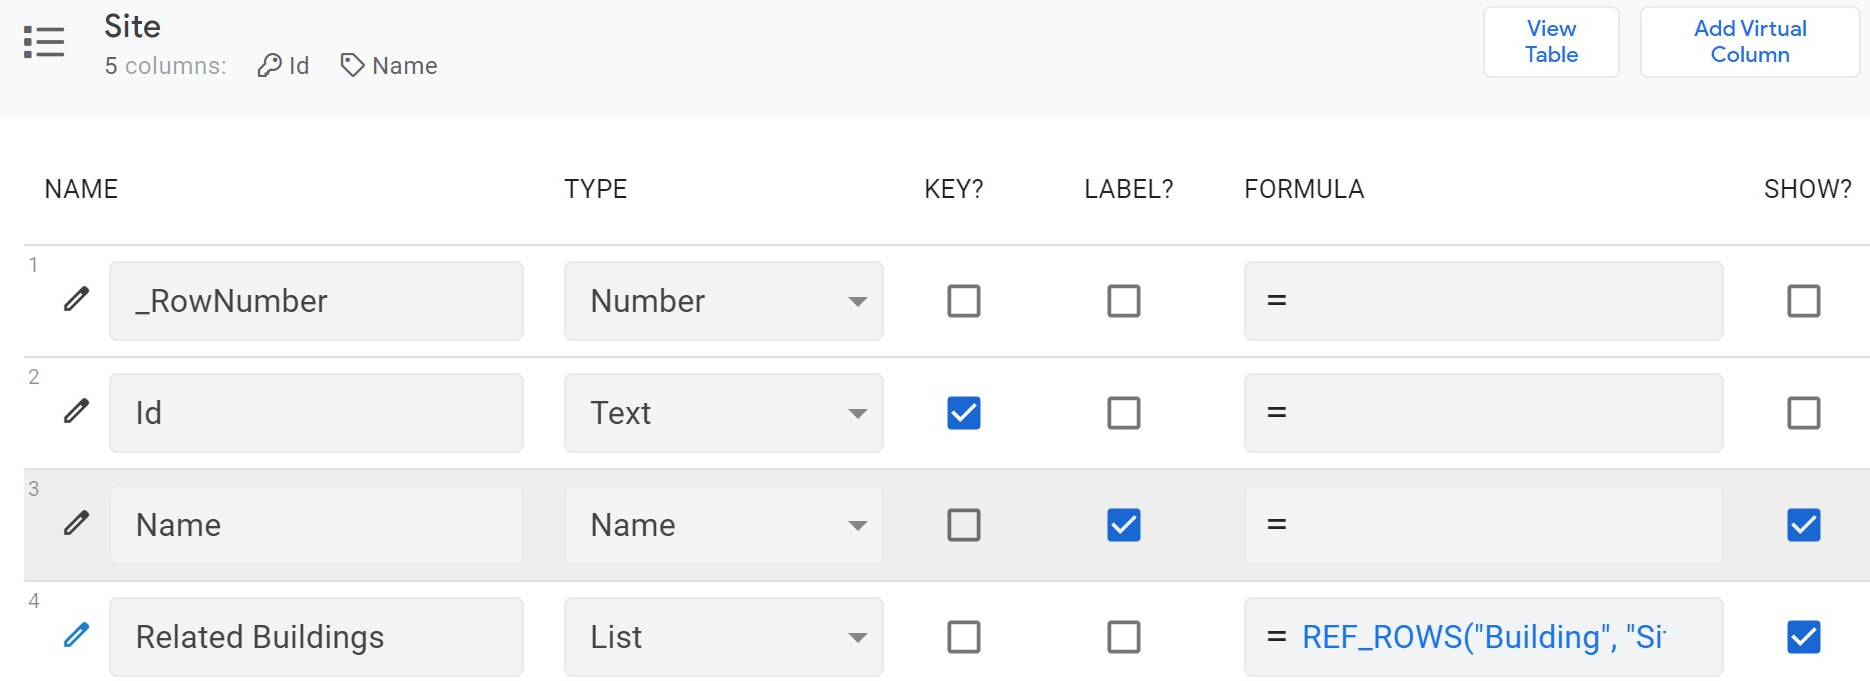
"It seems like AppSheet automatically infers relationships between tables based on their names and property names", Mia explains. Each table's foreign-key property (e.g. Building on Room) has a type of ref, while the referenced table features a column with all related refs (e.g. Related Buildings on Site). They confirm this by clicking through the preview app and creating sites, buildings and rooms, which works out-of-the-box using the "+" and "add" buttons.
But when opening the room booking form, they stumble on an issue: how can we store the person, who is booking a room? A quick Google search later, they navigate back to the column definitions of the _Room Booking_ table, set its initial value to `USEREMAIL()` and disable its `Show?` value. This ensures that the currently signed in user is added to any new booking.
### Securing the data
While the basic functionality of this already implemented, any user may add, edit and delete all data, even if it was submitted by other users. Furthermore, bookings are not validated, so they could overlap, which will cause confusion among users. To solve the first challenge, Mia proposes role-based permissions to be stored in a new table. This `User` table contains only two columns: _Mail_ and _Role_, both of which are storing plain text values and map a mail address to a comma-separated list of roles. "For now, I don't need this to be managed within the app. I'm fine with adding permissions manually in the Google Sheet", Oliver suggests. To apply the restrictions in AppSheet, we must navigate to Data ➜ Tables and change the formula in `Are updates allowed?` for rooms, buildings and sites to check, if the current user has the _Content Manager_ role. The code snippet below can be used to achieve this. It filters the `User` table for entries matching the active user and sets permissions to `ALL_CHANGES`, if _Content Manager_ exists in the list of roles and `READ_ONLY` otherwise.
```javascript
IF(
ISNOTBLANK(
FILTER("User", AND(
IN("Content Manager", SPLIT([Role], ",")),
[Mail] = USEREMAIL()
))
),
"ALL_CHANGES",
"READ_ONLY"
)
```
With protected information now only being editable by content managers, only room bookings need to be validated. There are two conditions for a booking to be valid:
1. its start time must be before its end time
1. there must be no other booking with an overlapping time frame for its room
The first statement is implemented using a simple _less than_ comparison between a booking's start and end dates. For the second statement, Mia uses her experience from a previous project: to compare two time periods, one's start date must be smaller than the other's end date and its end date must be larger than the other's start date. The special `_THISROW` variable refers to the row currently be evaluated, which helps to distinguish it from the values being filtered by.
```javascript
AND(
[Start] < [End],
ISBLANK(
FILTER(
"Room Booking",
AND(
[Room].[ID] = [_THISROW].[Room].[ID],
[Start] <= [_THISROW].[End],
[_THISROW].[Start] <= [End]
)
)
)
)
```
Since this actually filters by two criteria, we should tell the user why an input is invalid. The `Invalid value error` field allows us to show a custom error message below an affected field. This can either be plain text or a formula like the one below.
```javascript
IF(
[Start] >= [End],
"The booking's end date must be greater than its start.",
"This room is already booked during this time."
)
```
When showing the app to his colleagues, the feedback is overwhelmingly positive, but there is a critical issue: they want to see their bookings directly in their calendars, without having to manually sync changes between the app and their calendars. As this is a valid concern, Oliver again reaches out to Mia for support and they find a solution for [automatically syncing all bookings to a calendar](https://www.kevlatus.de/blog/syncing-calendar-events-with-appsheet) and inviting the organizer. With this solution implemented the next day, the facilities department agrees on deploying the app over the next few weeks and trying it out on scale.
Within just two days, without having any coding knowledge or spending money, Oliver created an app, which is used for managing room bookings at his company. This shows the benefits of a no-code platform like AppSheet: it allows for quickly prototyping ideas without making heavy time or budget commitments, while also empowering non-technical folks to build apps.
### Final notes
This was my first post about AppSheet and is supposed to give a general overview of its capabilities. I made the [RoomBooker app public](https://www.appsheet.com/Template/AppDef?appName=RoomBooker-2164883), so you may copy it or browse through its implementation. If you want to learn more about no-code platforms or have any opinion on this story, please leave a comment in the discussion and I will feature them in future articles.
~10 min read03 February 2021
Syncing calendar events with AppSheet
Building an app without writing code, can be a refreshing exercise to think differently about the development process. [In another article](https://www.kevlatus.de/blog/building-a-room-booking-app-without-writing-code), I described the steps required for developing a room booking app using the no-code platform AppSheet. But booking a room is not complete before the organizer received a confirmation. Therefore, this article explores options of adding events to a user's calendar.
Here is a quick summary of the RoomBooker: It stores sites, buildings and rooms in a Google Spreadsheet and allows users to book available rooms using a basic form. After a booking is added successfully, users expect it to appear in their calendar. Fortunately, AppSheet integrates with Google Calendar to manipulate calendar events. But there is an issue: calendars need to be added at build time, so we cannot interact with a user's calendar, since it is only known at runtime. To circumvent this, we need to [create a new calendar](https://support.google.com/calendar/answer/37095) specifically for this app. I decided to make this calendar available to public (or restrict it to a domain in a business environment), so anyone is able to see, when a room is booked. The app will sync bookings as meetings to the new calendar and invite the user as an attendee. The added benefit of this approach is, that users are not required to use a Google Calendar, but are free to use any provider as long as it accepts invitations via mail.
The calendar data can be added like any other data source using the "New Table" button on AppSheet's _Data_ section. For the actual event creation, we use actions and workflows from the _Behavior_ menu. First we create an action by performing the following steps:
1. navigate to Behavior > Actions
1. create a new action and call it "create event for room booking"
1. set the affected table to `Room Booking`
1. set the action to "Data: add a new row to another table using values from this row"
1. select the table containing calendar events as the `table to add to`
1. configure the values as shown in the image below
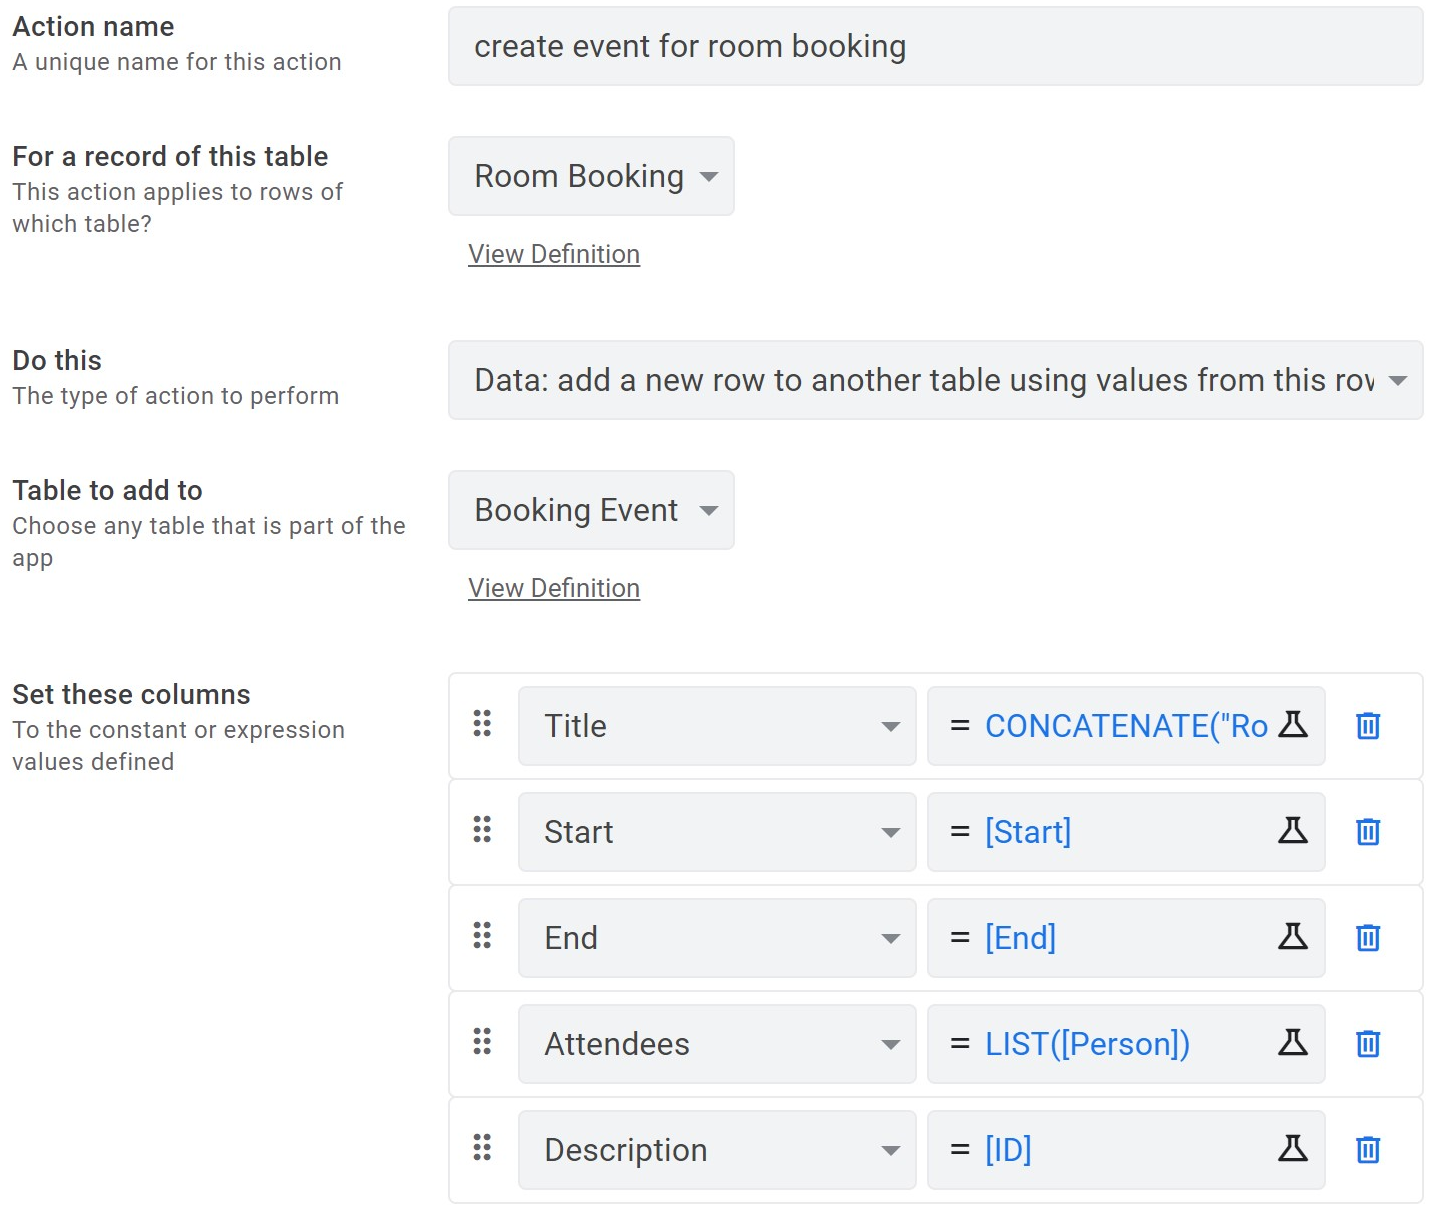
The title property is set to the formula `CONCATENATE("Room Booking - ", [Room].[Name])` to include booking details, but any other value can be used. Above steps leave us with an action that can be manually triggered by users. For the action to be triggered automatically whenever a new room booking is created, AppSheet's workflows are the perfect fit. But first, let's go back to the action's _Appearance_ options and hide it, so it can't be triggered manually. Then we create a new workflow:
1. navigate to Behavior > Workflow
1. create a new workflow and call it "on adding new room booking"
1. set the target data to `Room Booking` and the event to `ADDS_ONLY`
1. under `run these tasks...` choose `change data`
1. select our previously created action "create event for room booking"
With this setup, our goal is already achieved: whenever a user books a room, he or she will receive a calendar invitation for the selected times. Actually, we will dive deeper and update calendar events, when a booking is changed or deleted. The booking ID, which is saved within an events description comes in handy here. Let's first delete a booking's event:
1. navigate to Behavior > Actions
1. create a new action and call it "delete event for room booking"
1. set the affected table to `Room Booking`
1. set the action to "Data: execute an action on a set of rows"
1. select the table containing calendar events as the `referenced table`
1. insert the formula below into `Referenced Rows` and set the action to "Delete"
```javascript
FILTER(
"Booking Event",
[Description] = [_THISROW].[ID]
)
```
To apply changes to a booking, we could propagate them to the calendar event by copying them in an action. Alternatively, we leverage the existing actions within a workflow to first delete the existing event and then create a new one with updated information.
Bonus Tip: if you want to create all day events from AppSheet, the end date needs to be one day apart from its start. This can be achieved by simply using the formula `[Start] + 1` for an end date.
~4 min read02 February 2021
How to build advanced layouts in Flutter
Can we position widgets within custom shapes in Flutter? Actually, the framework provides a solution for building any kind of layout logic using CustomChildLayouts. I will show you how to implement a CustomMultiChildLayout to center any widget within the slice of a circle. How to draw that slice using a CustomPainter is shown in [my previous article](https://www.kevlatus.de/blog/making-of-flutter-fortune-wheel) in this series. This example is relevant, since all widgets in Flutter are based on rectangular boxes with each slice actually having the following bounding box.
Therefore, we cannot use widgets like `Center` or `Align` in this scenario, since they position relative to the bounding box. Time to introduce the `MultiChildLayoutDelegate`: a base class for providing your own layout logic by implementing the `performLayout(Size)` method. Within this method two tasks need to be performed:
1. all children are given their box constraints
1. the resulting boxes are positioned within the available bounds
To identify child widgets, the framework provides us with the `hasChild` method. In order for them to work properly, each child needs to be given an ID, which can be understood as the _role_ it takes within the layout. The following code shows how this is achieved using the `LayoutId` widget.
```dart
enum CircleSliceLayoutSlot {
Slice,
Child,
}
class CircleSliceLayout extends StatelessWidget {
final Widget child;
final CircleSlice slice;
const CircleSliceLayout({this.slice, this.child});
@override
Widget build(BuildContext context) {
return CustomMultiChildLayout(
delegate: CircleSliceLayoutDelegate(slice.angle),
children: [
LayoutId( // ⬅ ⬇
id: CircleSliceLayoutSlot.Slice,
child: slice,
),
LayoutId( // ⬅ ⬇
id: CircleSliceLayoutSlot.Child,
child: Transform.rotate(
angle: slice.angle / 2,
child: child,
),
),
],
);
}
}
```
An enum helps us to distinguish between the circle slice and its child widget, which makes the code more readable and maintainable, but you could also use raw values/constants. Now let's look at the `CircleSliceLayoutDelegate` implementation.
```dart
class CircleSliceLayoutDelegate extends MultiChildLayoutDelegate {
final double angle;
CircleSliceLayoutDelegate(this.angle);
@override
void performLayout(Size size) {
Size sliceSize;
Size childSize;
if (hasChild(CircleSliceLayoutSlot.Slice)) {
sliceSize = layoutChild(
CircleSliceLayoutSlot.Slice,
BoxConstraints.tight(size),
);
positionChildCircleSliceLayoutSlot.Slice, Offset.zero);
}
if (hasChild(CircleSliceLayoutSlot.Child)) {
childSize = layoutChild(
CircleSliceLayoutSlot.Child,
BoxConstraints.loose(size),
);
final topRectVector = Math.Point(sliceSize.width / 2, 0.0);
final halfAngleVector = rotateVector(topRectVector, angle / 2);
positionChild(
CircleSliceLayoutSlot.Child,
Offset(
halfAngleVector.x - childSize.width / 2,
halfAngleVector.y - childSize.height / 2,
),
);
}
}
@override
bool shouldRelayout(CircleSliceLayoutDelegate oldDelegate) {
return angle != oldDelegate.angle;
}
}
```
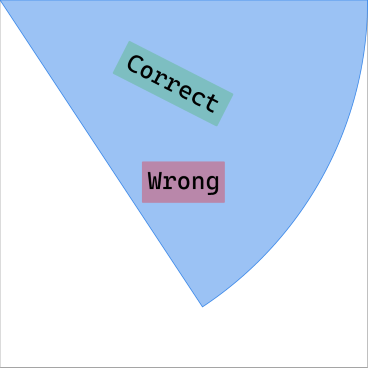
Within `performLayout`, we first search for the slice widget by its ID and expand its box constraints to fill the available bounds. The child widget is supposed to only take up space it actually needs, which can be achieved by using loose box constraints. Centering this box within the slice is the tricky part. The image below visualizes the math involved in finding the correct offset for the child.
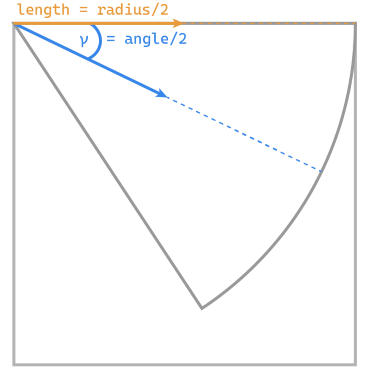
We want to position the child widget on the line, which cuts a given slice in half. To achieve that, we start of with a vector that points to the center of the top edge of our bounding box starting from its top left. This ensures that the vector's length is half the circle's radius. To actually point to the center of our slice, we need to rotate this vector by half the slice's angle, which gives us the blue vector in above illustration.. If you are interested in how the `rotateVector` works, you can find its implementation in [this package's Github repository](https://github.com/kevlatus/flutter_fortune_wheel/blob/main/lib/src/util/util.dart#L10). With the slice's center at hand, the child's offset can be retrieved by adjusting the center to the child's size. If you believe there is a simpler way to achieve the same result, I encourage you to send me a message or comment with your ideas about this problem; I am always glad to learn of new features and tricks.
The last aesthetic adjustment is a child widget's rotation. Since I use text children in the examples, it makes sense to run them along the vector's line. As can be seen in the first code sample, this is achieved by wrapping it in a `Transform.rotate` with half the slices angle. But for icons or other use cases no rotation or another angle might be necessary, so this is up to your use case.
Finally, we can build a fortune wheel from individual slices, each having correctly centered children. This shows that CustomMultiChildLayouts do not necessarily be composed of many widgets and can also be used for describing complex parent-child relationships. If you have any questions about this example, feel free to reach out to me or consult the [MultiChildLayoutDelegate docs](https://api.flutter.dev/flutter/rendering/MultiChildLayoutDelegate-class.html).
In my next article in this series, we will make the wheel actually spin using animation curves. Until then, you can spin the wheel yourself by installing it from [pub.dev](https://pub.dev/packages/flutter_fortune_wheel).
~6 min read20 January 2021
Making-of: Flutter Fortune Wheel
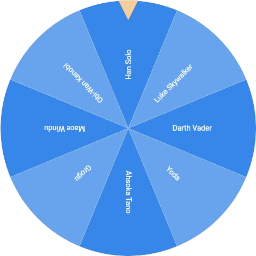
Have you ever been frustrated by not finding a suitable package? Recently I encountered this feeling while looking for a wheel of fortune in Flutter. So I decided to dive deep into Flutter and build one myself. What follows is the story of creating a fortune wheel, like the one shown below, using CustomPainter, LayoutDelegate, animations and more. It is the first part of a bite-sized series on the details of [this package](https://pub.dev/packages/flutter_fortune_wheel).
My main objective was to create an implementation, which is composed of individual Flutter widgets instead of using images, [as other solutions do](https://pub.dev/packages/flutter_spinning_wheel). This allows for making best use of hot reloading and does not require additional tools for creating suitable images. Furthermore, each slice within the wheel should allow for individual styling as well as hosting arbitrary child widgets. Finally, the wheel must spin before showing a selected value to be a real wheel of fortune, which we will achieve using a Bezier-curved animation.
Let's start by drawing a simple slice of a pizza...ehm...circle 🍕
```dart
Path buildSlicePath(double radius, double angle) {
return Path()
..moveTo(0, 0)
..lineTo(radius, 0)
..arcTo(
Rect.fromCircle(
center: Offset(0, 0),
radius: radius,
),
0,
angle,
false,
)
..close();
}
```
The code above draws three simple lines:
1. a straight line from the top left corner to the top right corner
1. a curved line from the top right corner to the bottom left corner
1. a straight line from the bottom left corner back to the top left origin
Drawing this path using a CustomPainter is shown in the picture below. I added a border to the surrounding widget to highlight that it still has a rectangular shape, as all widgets in Flutter do. In general, this is no issue, but as we will see later, it might complicate positioning, when adding indicators to our wheel.

```dart
class CircleSlicePainter extends CustomPainter {
final double angle;
final Color color;
const CircleSlicePainter(this.angle, this.color);
@override
void paint(Canvas canvas, Size size) {
final radius = Math.min(size.width, size.height);
final path = CircleSlice.buildSlicePath(radius, angle);
canvas.drawPath(path, Paint()..color = color);
}
@override
bool shouldRepaint(covariant CustomPainter oldDelegate) {
return false;
}
}
class CircleSliceView extends StatelessWidget {
@override
Widget build(BuildContext context) {
return CustomPaint(
painter: CircleSlicePainter(Math.pi / 2, Colors.blue),
);
}
}
```
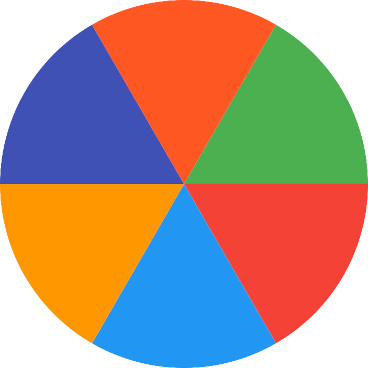
This example uses our previously defined `buildSlicePath` function to draw its path on a canvas. The slice's size can be configured using the _angle_ property of the `CircleSlicePainter`, which determines the part of the circle to be drawn, ranging from 0 to 2 × π. Now that we know how to draw a single slice, we can build a circle by drawing many slices and rotating them accordingly.
```dart
class CircleView extends StatelessWidget {
@override
Widget build(BuildContext context) {
final colors = <Color>[
Colors.red,
Colors.blue,
Colors.orange,
Colors.indigo,
Colors.deepOrange,
Colors.green,
];
double anglePerSlice = 2 * Math.pi / colors.length;
return Stack(
fit: StackFit.expand,
children: [
for (int i = 0; i < colors.length; i++)
Transform.rotate(
angle: i * anglePerSlice,
alignment: Alignment.topLeft,
child: CustomPaint(
painter: CircleSlicePainter(
anglePerSlice,
colors[i],
),
),
)
],
);
}
}
```
A slice's size can be computed by dividing its maximum size (2 × π) by the number of slices. The stack widget allows us to put all slices at the same position. Then each slice is rotated according to the angle obtained by multiplying the size of a slice with its index in the circle. The center of our circle is actually in the top left corner of each slice's box, as can be seen by the example of drawing a single slice. Therefore, the alignment for its rotation is set to `Alignment.topLeft`.
Great! We are now able to draw a circle composed of any number of individually customizable slices. [In my next article](https://www.kevlatus.de/blog/how-to-build-advanced-layouts-in-flutter), we will implement a MultiChildLayoutDelegate to correctly position child widgets within the slices. In the meantime, if you don't want to wait for the next article, you can find the package's code [on Github](https://github.com/kevlatus/flutter_fortune_wheel).
### Further reading
* [CustomPainter](https://api.flutter.dev/flutter/rendering/CustomPainter-class.html) Flutter docs
* [my inspiration](https://github.com/baobao1996mn/flutter-fortune-wheel) for using a path-based approach
~5 min read09 January 2021